
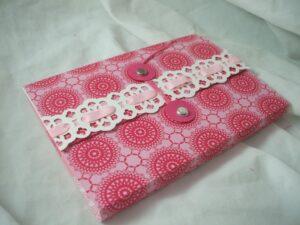
At Convention this summer, one of the presenters shared the cutest little slider card, easily done with the exclusive new Peekaboo Windows die for the Big Shot. It went right into my notes, as I really wanted to try it when I got home! It turned out so cute, and was a perfect fit for my "moving-parts" cards event last weekend. So here's the skinny on how to make it at home! Above, the card is shown with the slider pulled open. Below, it's shown closed.

Lots of people miss the Peekaboo Windows die in the catalog (bottom left corner of page 193, not shown full size), but it is a hidden gem! It cuts out five different types of windows, all of which fit on a card and really dress up scrapbook pages, too. In fact, this slide would make and adorable spot for some hidden journalling in your next book!
The sliding mechansim is soooo simple. It's just a small rectangular piece cut from the same cardstock as the peekaboo window. It needs to be just slightly smaller than the door of your peekaboo window part.

I scored three lines into the door panel of my peekaboo window so that it would pull open like a louvered closet door, hinged in the center. You can make this work for any size window by scoring a 1/4 strip on one end, and the end of the window on the other, and then dividing the space between those in half for your middle score line (the pen marks I made above are very slightly off, I see!)
To attach the strip which you will pull to make the slider open, use mini glue dots where I drew the circles in the photo above. That gets attach to the underside of the peekaboo window on the narrow strip we scored on the door panel. You can see it a little better in this side view.

I adhered a small button on the end of the strip to make it more obvious where to pull to open the window.
The only part you have to be careful with is when you are adhering the window and mechanism down onto your cardfront. Make sure you don't get any adhesive on the right hand side of the card where the slider must pull out. I adhered my peekaboo window with a mini glue dot in each corner, then one in the middle of the top and bottom. That puppy ain't goin' nowhere! I love mini glue dots. You can also use Sticky Strip or Tombo Multipurpose Liquid Glue, but use something more than regular SNAIL mono adhesive, as there will be a lot of tension on the card as it is pulled multiple times by the amazed recipient : )
A simple and quick way to make a card with a lot of wow! I encourage you to:
- experiment with other window shapes to make your own slider.
- be sure to take a closer look at the Peekaboo Windows die.
- leave me a comment if you appreciate FREE photo tutorials!
- be sure to tell your friends there's lots of fun and free inspiration at Song of My Heart!


Cute idea! Wish I had the Peekabo die to make this:)
Thanks for this helpful tutorial! I’ve got to try this!! Cute card. 🙂
I love those little windows and yes, I’ve put mine aside for a long while. Thanks for this cute way to revive them 😉
Adorable and great instructions.
Thanks Lyssa.
Cute card and great instructions. Thanks for sharing!