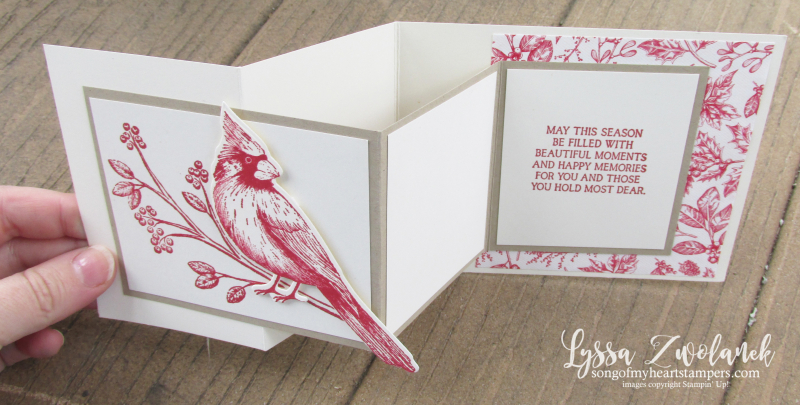
I'm partial to this card fold–Z is a pretty awesome letter, and this layout is a DOUBLE Z! We made these beauties in Christmas Club this year and I wanted to share them with you, because they're such an easy WOW. I used the cardinal stamp and die from Stampin' Up's Toile Christmas and the Real Red side of the Toile Tidings papers for mine.
This fun card folds down flat to fit in a regular A-2 (medium) envelope and it still ok for mailing with ordinary postage as long as you don't add stick-up embellishments. Maybe just a Linen Thread bow or some Shimmery Crystal Effects.
To begin, you'll need:
- Simply Scored Board or Paper Trimmer with scoring blade
- Strong adhesive such as Tear & Tape or Liquid Multi
- Very Vanilla cardstock for base and panels
- Crumb Cake or other accent color cardstock for the attachment
- Patterned paper
- Stamps, ink, die cuts, etc to decorate
You're going to love how easy this is!
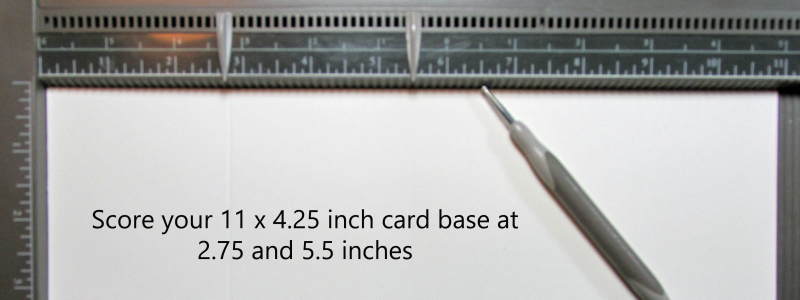
First, cut a Very Vanilla card base of 11 by 4.25 inches. Score it at 2.75 and 5.5 inches on the long side.
Fold in the center, then fold the front back on itself. That's a regular z-fold card.
Now we need to add the double z!
Cut a strip of Crumb Cake cardstock (or your accent color) measuring 10 by 3.25 inches. Score at 4 and 7 inches on the long side.
Fold this strip into a z, with the widest panel on top. This is what will be seen when the card is closed.
The Very Vanilla pieces are 3 x 3.75 inches for the widest panel, plus two 3 x 2.75 inch panels for the insides.
Decorate and stamp your z-fold strip strip and card base BEFORE you adhere them! Ask me how I know this!!!
When you adhere the strip to the base, use a strong adhesive, because regular SNAIL is not going to be ok with the stress the pieces will be under. The right adhesive gives you the right results!
Start with attaching the front, not the back. Check to make sure the widest panel is centered on the card base before adhering, then fold the strip and press the card closed to ensure perfect placement of the back panel.
If your card looks like this when you're done–you're good!
Isn't that a great fold? I want to do this one again at Easter. it would be super fun for birthday cards, too!
What type of card are you going to make with this idea? Let me know in the comments! And if you love photo tutorials, check out the 100% Free Photo Tutorial Library here at Song of My Heart for more than 100 papercrafting projects broken down step by step.


What size did you cut the DSP behind the sentiment?