I apologize for not posting these projects last week, but it's been crazy around here! Both kids had strep throat, and then a terrible cold, which I caught. It has really laid me down for the count. I am persona non grata for my choir director today for missing the Easter cantata, but I can't stop sneezing or dripping, so he's just gonna have to deal. I am very sorry to be missing the performance of all the wonderful songs about my Savior's sacrifice that we have been practicing these past weeks.
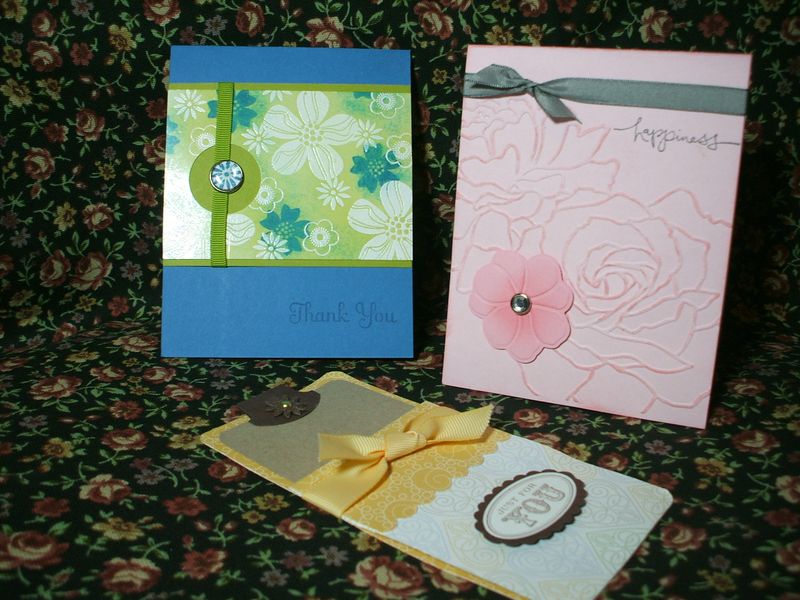
Anyway, I got the photos taken and downloaded and here we are. I know there was only supposed to be two projects but when I got the new Manhattan Flowers Textured Impressions die that week and ran it through the Big Shot, I flipped out–it was so fabulous. So the pink card (which you may have wondered about) which doesn't fit the Hawaii theme at ALL–was a last minute addition. It's just one layer of Pink Pirouette cs run through the folder, with the Simple Flower embosslit and a rhinestone brad, and a bit o' sponging. Simple and gorgeous–and the Manhattan Flowers die is a STEAL at just $7.95.
Then I made a long pocket card out of that cute free SAB DSP and ribbon, some of our fun punches, and the new Oval All set with its matching new Scalloped Oval punch. It's hard to see, but there's a Chocolate Chip Felt Flowers Too on the Round Tab Punch where you pull up the card. There was also a tea bag tucked in the pocket–fun!
The final project featured emboss-resist–you emboss white images on white glossy paper, then stamp and sponge over the top. The ink doesn't stick to the embossed parts, so it looks like the steps were done in the reverse order. This technique is an oldie but a goodie, and I was pleasantly surprised at how many people had never tried it before. We used Pacific Point (seemed appropriate) and Kiwi Kiss (likewise) colors for both cardstock and ink.
Everyone loved the Build A Brads. This is something I had not demo'd before, so most of the ladies had never tried them. They are great fun! You stamp something fun, punch it out with the 1/2 inch circle punch, adhere it to the brad backing, and add the crystal covering. It looks like a custom-designed brad. There's two other really cool things I have heard about doing with these–one is to stamp letters and spell out a word or name with them–that can be added to a name frame, scrapbook page, or turned into refrigerator magnets (!!!)–and the other is to use them to showcase super tiny photos or little bitty trip souveniers. TOO COOL.


