
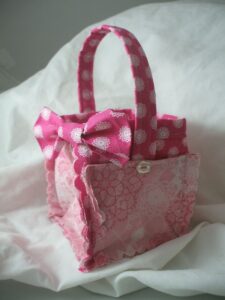
You'll become addicted to making these adorable little scrapbooks, designed to clip to a tote bag or backpack and remind the wearer that they are loved! Just 3×3 inches square, and using only one sheet of double-sided patterned scrapbooking paper, they are so easy to make that your kids could even do them for a classroom project sometime.
Welcome to our featured Sale A Bration 2016 post, showcasing the Wildflower Fields Designer Series Paper! Get yours free with any $50 order: details here!
To get started, you'll need a 12×12 sheet of double-sided paper; scoring tools like the Simply Scored or a Paper Trimmer; a heavy-duty hole punch such as the Crop -A-Dile; a jump ring or other clip or buckle mechanism; some ribbon; and stamps, ink and punches as desired to embellish your little book.
Begin by scoring your 12×12 sheet of paper at the 3, 6, and 9 inch marks.

Turn the paper 90 degrees and score it again at the 3, 6, and 9 inch marks. This will leave you with a "grid" of sixteen identical 3×3-inch squares.


Next, slice up the center score line, stopping when you get to the three-inch score. So you're cutting the paper almost in half, but not quite (shown above).
When you've done that on the center score line, turn the paper 180 degrees and slice up the right hand score line, to the three-inch mark (shown below).

Then slice up the left-hand score line the same way you did the right, stopping when you get to that 3-inch mark (shown below).

if you've done your slices correctly, it should look like a giant letter "M." Got it? Great! That was the hard part! Now we just accordion-fold the entire thing, starting with the lower corner.

Back and forth, back and forth, folding up the whole piece of paper. When you get to the end of a "row," fold upwards and continue across the next row (see below).


When the entire paper is folded, you'll wind up with a little "book" with about 12 pages. You can adhere some of the folded ones down flat, if you prefer, or leave them open and have even more pages. 
Use a Crop A Dile to punch a hole for your ribbon. Knot the ribbon loosely, with enough "give" in it so that you can open the book easily. Add the jump ring or clip to the ribbon.

There you go! Cute as a button and super simple to make. Economical, too! And they are very sturdy because of how many layers of paper they contain.
Please leave a comment if you enjoyed this tutorial–it keeps me encouraged and posting! If you do not have a Stampin' Up demonstrator already, please consider me yours. I would love to provide you with free catalogs and fantastic customer service! Lyssa@songofmyheartstampers.com

Love this little scrapbook! thanks for sharing!
What a fun idea! 😀 I can’t wait to try this. 😀