Hey everyone! Welcome back to Day Four of Song of My Heart's Real-Life Valentine Crafting Adventures blog series! Penni and I are sharing our personal Valentine cards today and we hope you're enjoying all the cool tips and ideas we've been posting this week. Missed a day? No problem! Click here for Day One, here for Day Two, and here for yesterday.
I wish we could give away a crafting session with the two of us! Wouldn't that be a ball?! But you'll have to settle for free Glimmer Paper and a selection of the projects from this series, if you win. Enter once on each post by leaving a comment (up to five chances to win) by Sunday night, and we'll draw the winner next week!
On to today's inspiration!
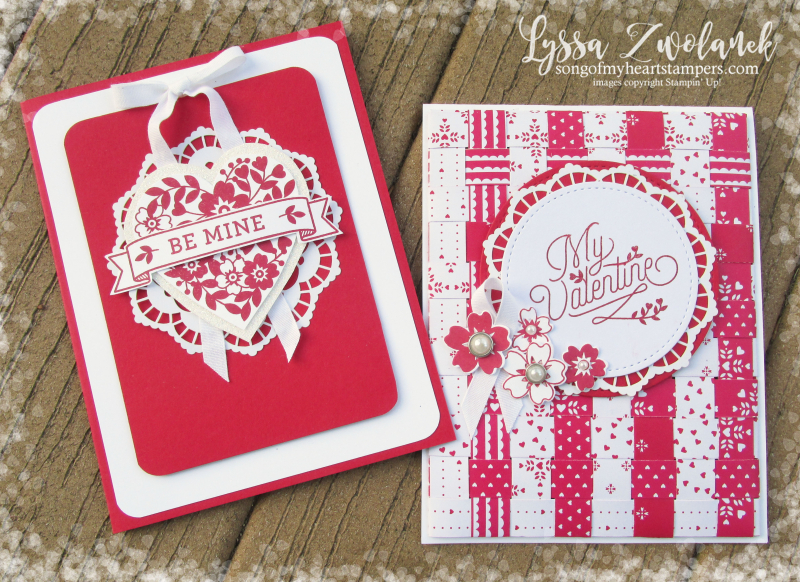
If you like to go over-the-top now and again for a special occasion, these first two cards are for you! I made this Victorian-inspired faux "hanging" heart on the left and the woven strips background card on the right. Both were a little more time-consuming and both admittedly do use Valentine-specific stamps (Bloomin' Love stamp set and matching Bloomin' Heart Framelits). You could easily adapt either layout for a spring card. It's all layered up with the new Stitched Shapes Thinlets.
Real-Life Tips & Tricks #1: we are crazy for the new cardstock (not paper) Lace Doilies from the Spring 2017 Occasions Catalog. They are white on one side and vanilla on the other, so no more being limited to one color when you craft! And being made from cardstock makes them so much sturdier and nicer than the thin tissue ones. You really do get what you pay for when it comes to doilies.
Penni and I went a little less formal for our other Valentine needs. She made gift card holders with the Gift Card Envelope & Trims dies and heart-shaped balloon cards with the Balloon Builders stamp set and sayings. The cool Stitched Diagonal Stripes layout is a design from Cheat Sheets Collection #5. 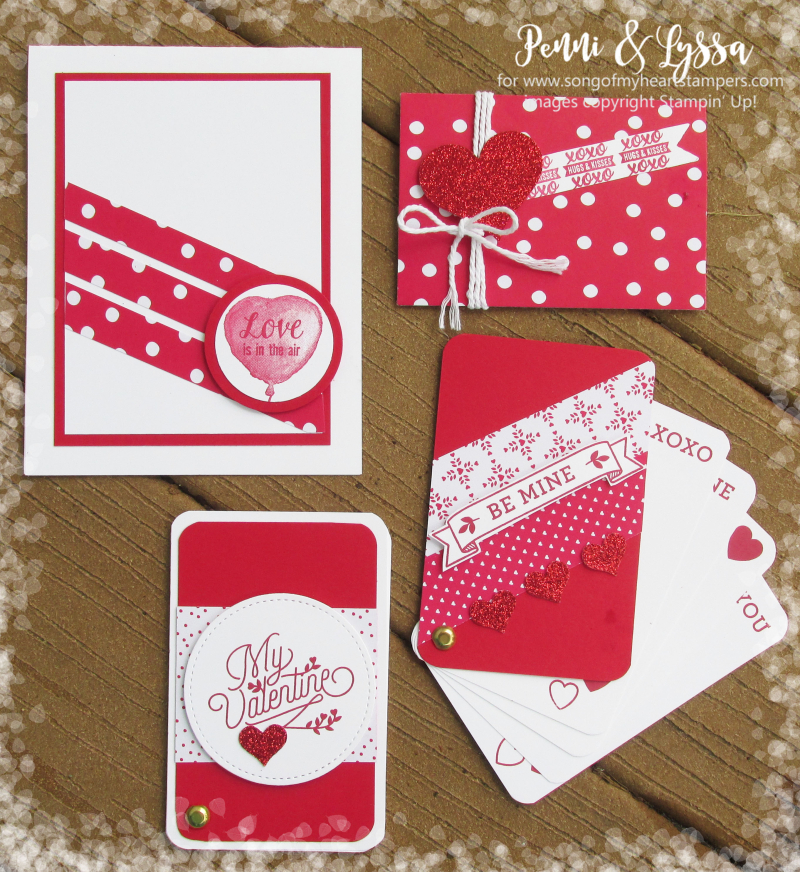
Real-Life Tips & Tricks #2: Penni cleverly repeated a tiny stamp image from Sweet Stack along a banner. Repeating a small image gives it more weight and "presence" on a card. In this case it allowed a little stamp to become a much bigger element than it actually is. So if all you have that is appropriate for a holiday is one little stamp, remember this tip and you're still good to go!
For my casual Valentines, I have been making a lot of these Fan Deck Cards from Cheat Sheets Collection #20. They are easy and fast! and the covers are small and I can use up a lot of little scraps to decorate them.
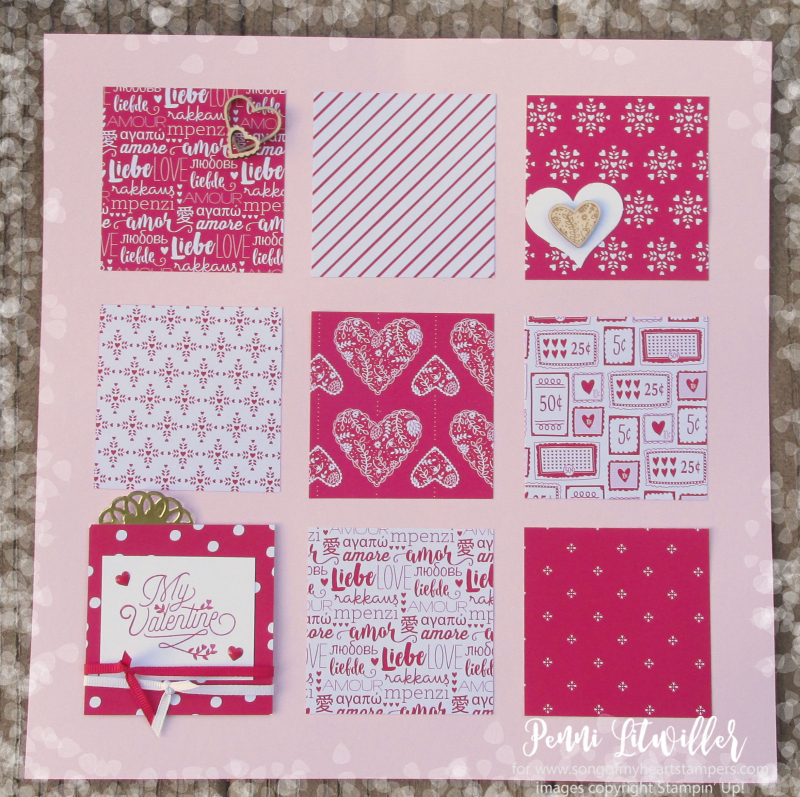
Penni is way more up to date with her scrapbooking than I am… ironically the scrapbook teacher is too busy designing for her class members to keep up with my own kids! This is a great page with lots of space for photos and some fun little details that draw the eye, like the Enamel Shapes hearts; the engraved flat wooden Sending Love Embellishments; the Metallic Doily in the gold finish; and the sweet new Sending Love grosgrain ribbon combo pack. Together with the Sending Love Designer Series Paper stack and a Pink Pirouette base page, she's all ready to snap, print and paste her photos in after the holiday!
Real-Life Tips & Tricks #3: Stampin' Up suites save you money! Never worry again about coordinating colors and whether or not the paper will match the ink, the cardstock will match the paper, the ribbon will match anything, etc. Sending Love is a good one because hearts are versatile and can be used year-round, and the patterns on the paper stack are not too Valentine-specific to be used for other occasions.
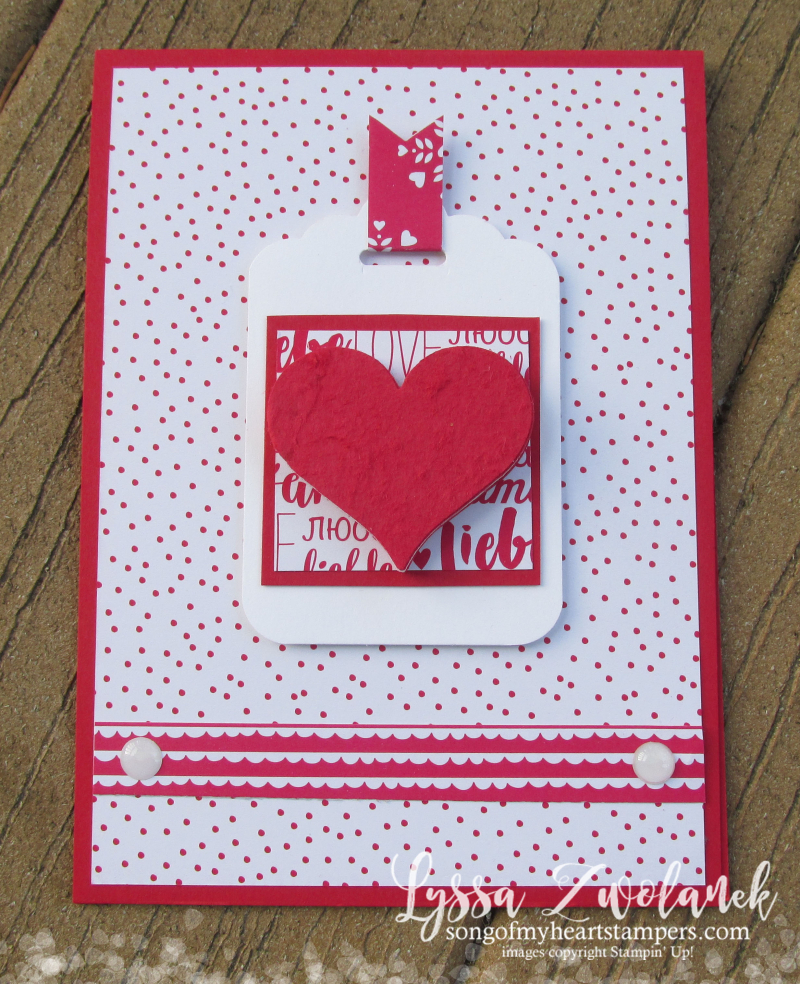
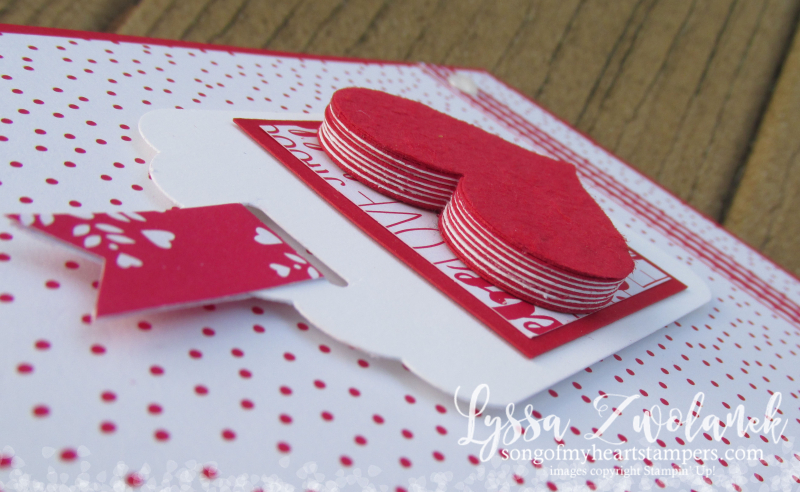
My last Valentine card shares my favorite tip for today–making custom embellishments from any punched shape. Check out the side view of this rather ordinary-looking card…. we've got some KILLER dimension goin' on here!
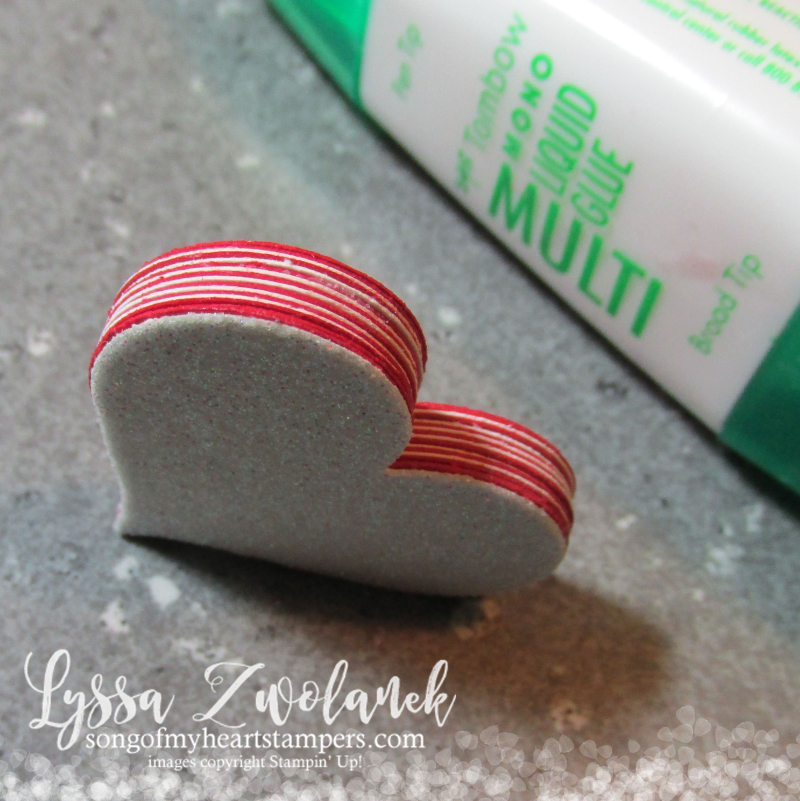
Real-Life Tips & Tricks #4: save your money and create a custom embellishment in any color you need, using any punch shape! I used the Sweetheart Punch and layers of Real Red and Whisper White cardstock to stack one on top of the other until I had the height I wanted. Use Liquid Multipurpose Glue so that you have the time to play with positioning and get it extremely straight before it dries. I glued one last extra Real Red heart on top, and when it was dry, pulled off the top layer to reveal the fuzzy inner core (a technique called faux suede). Fun! You can top them with sparkly Glimmer Paper, too, like I did in the photo below.
Wow! I think we crammed in as many projects as we could on one post! I hope you're getting so much good from our blog series. Can't believe tomorrow is already Day Five!
Now, today's assignment is to leave us a comment and let us know what upcoming holiday we should collaborate on for our NEXT adventure! Mother's Day, Easter, Fourth of July??? Give us a couple months to recover from this one. What could you use a whole week's worth of concentrated inspiration for?



Loving all the tip and tricks you’ve been sharing all week. The dimensional heart embellishment is wonderful – I love being able to make custom detailed embellishments that match exactly. I think combining today’s dimensional heart with yesterday’s fabulous “conversation hearts” idea would make some really cute decor items to set on a little shelf!
Love the use of the punches and paper suite
SO many great ideas, you guys! By the way, I really did make a heart wreath after reading yesterday’s post. I am tickled with how it turned out!
I would love to see a Mother’s Day series. I think it would awesome to spoil my mom and mother-in-law with an avalanche of cute things!
I think you should collaborate on every holiday, real and imagined. St. Patrick’s Day, the first day of spring, National Bacon Day, Friday……..
I love seeing what the two of you cook up together, and I have fun imagining all the hilarity that ensues when you craft together!
Love the fan deck card — so clever!
i think st patricks day it is so often overlooked thank
I’m liking this post very much. However, the stacked heart at the end is fantastic!
Thanks again for sharing.
Love, love, love all the beautiful ideas! Thank you! Hope you decide to do this for Easter…..
I love all the ideas today, especially the layered heart embellishment! I think you two should do Easter next.
Hearts are beautiful…love the stacked idea. Thanks for sharing all these wonderful creations!
WOW! More great projects! My favourites here are the gift card holder – great tip about repeating a small stamp – and the fan-deck card – so cute!
I love the woven background card!! It is so beautiful. A Mother’s Day series would be lovely.
Love the stacked embellishment! All your work is beautiful! I’d like Easter for the next project.
What a great idea..stacked hearts. I have enjoyed your posts this week. Thanks.
Thanks for all the tips and tricks you’ve been sharing this week. I like the stacked embellishment idea. Mother’s Day or Easter for your next adventure!
You really overwhelmed me with the amount of projects presented today. It is fun to see someone else’s ideas and see how I can make subtle changes to make it my own. Thanks. I vote for Easter as your next big holiday adventure.
Easter, Mother’s Day AND the 4th of July! These are AWESOME projects. <3
Great tip on making your own embellishments. I will definitely be trying that.
Please do Easter for your next series. Please use the ‘Basket Bunch’ set if you can, a mix of fun and religious projects would be nice. Thanks for doing this for us, I can only imagine how much work it was to do.