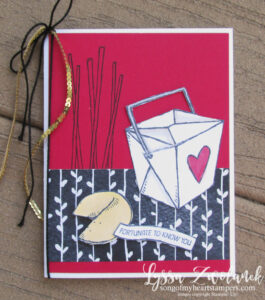
 I invented this fun little box one afternoon when I needed something new for a group of veteran stampers at one of my Great Giftables workshops. It turned out to be a real hit, so I’ll share it with you!
I also am sending each of the six winners of my Convention Quality Demonstrator-Only Swap on www.splitcoaststampers.com a complete kit to make their own! Enjoy! I will be posting their prize-winning swaps here after the contest if they agree.
1. Gently score a 9×7 piece of DSP one and two inches from each tall side and two and three inches from each wide side.
2. Trim out the corners up to the score lines.
3. Fold box together and secure sides and bottom with Sticky Strip.
4. Fold back inside flaps on themselves as shown and secure with SNAIL.
5. Adhere a 2×3 scrap of DSP to the front inside as shown for contrast, if desired.
6. Punch edges of lid and edges of Chocolate Chip strip with the ticket corner punch.
7. Stamp the desired saying on scrap DSP and punch out using the Small Oval punch.
8. Adhere the saying to the center of the Chocolate Chip strip and add the oval Hodgepodge Hardware using brads.
9. Adhere the taffeta ribbon to the lid using Sticky Strip.
10. Cover with the Chocolate Chip piece using Sticky Strip, matching the ticket corner punches you made on the lid.
11. Using the scraps you trimmed from the edges of your project, decorate four 3×3 notes to insert in your box.
12. Tie ribbon in a loose knot to hold box closed.

Thanks so much for the instructions!!!!!
Love this paper! I will have to try out your way of doing boxes. It sounds easier than how I do them. They look great by the way.
Gojus!! I can’t bring myself to actually USE the HPH frames. You go girl! I’m hoping being able to buy them in bulk will help overcome my hoardingness… 🙂 I’ve followed your progress all this last year while you built up your business–way to go.
Your group 3 sister,
Very cute boxes. TFS the directions. I will be trying.
Fantastic Lyssa! I now have a plan for my Vanilla HPHW bulk buys! TFS!!!!