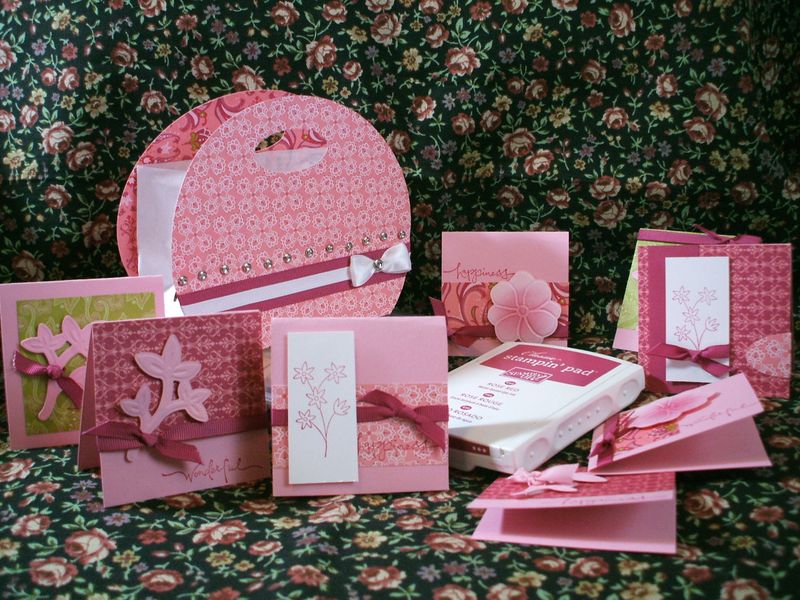
I'm typing this post during our blog hop, so I have no official winner of the "favorite project" blog candy comments yet, but I can already see it is going to be a close tie between this handbag and the name frame! So I decided to get this post ready to go for when the tour ends,so you all can start right away on these adorable purses.
The original idea was adapted from a SAM project (Service Account Managers for SU demos who have reached a certain level) from a couple years ago and passed to me by my former upline. There is a pattern floating around out there on the internet, but honestly, no pattern needed!
To make the handbag, you need 2 six inch circles of double-sided paper (Raspberry Tart shown here). I used my new Circle Scissor Plus by Stampin' Up to make two lickety-split. You just Dotto your DSP to the Glass Mat, set the circle scissor as large as it goes, and spin the handle. I am really starting to like that thing. Combined with the Scallop Circle Big Shot die it is just to "die" for! In the absence of this wonderful toy, you could find a six-inch plate or other circular item and trace around it. But that's so old-school. You really need the Circle Scissor Plus!
After you have the two circles cut, hold them together and cut off about one inch of the bottom edges all the way across in a flat line. The resulting line should be the length of the width of your lunch sack. You can take a bit more off if you need to, so cut less to begin with if you're worried about being exact. Not all lunch bags are created equal!
Holding your circles together, you can punch through both pieces at once with the Large Oval punch to make the handles (only if using DSP–if using cardstock, punch one and then use it as a template to line up the other). The handles should be directly above the flat line at the bottom of the bag, and in far enough that they won't easily tear when you pick it up by the top.
Then decorate your purse front and back with ribbon, punch art, or go a little bit nutso with the Rhinestone Brads like I did. I used the Mat Pack to line them up in a perfect row.
Now for the innards… the inside of the handbag is an ordinary white lunch sack (yay–no more hunting for impossibly small paper sacks at specialty stores!). I buy these for my kids to stamp for their sack lunches and they are too cute. Leave the bag closed and flat and cut off the upper portion of the bag right at where the bottom hits when the bag is folded. It will make more sense when you are looking at the folded bag in front of you, I promise.
If you cut it off there, it will give you a bag that is small enough to hide completely behind the six-inch circles. Adhere the front and back of the purse to the long sides of the bag. with Sticky Strip. Then fill your cutsey purse with matching cards–either 4×4 or 3×3 will fit just fine, even the regular A-5 kind will fit if you don't mind them in there slant-wise. And you should include a little chocolate in the bottom, because every woman needs to keep a little emergency chocolate in her purse.
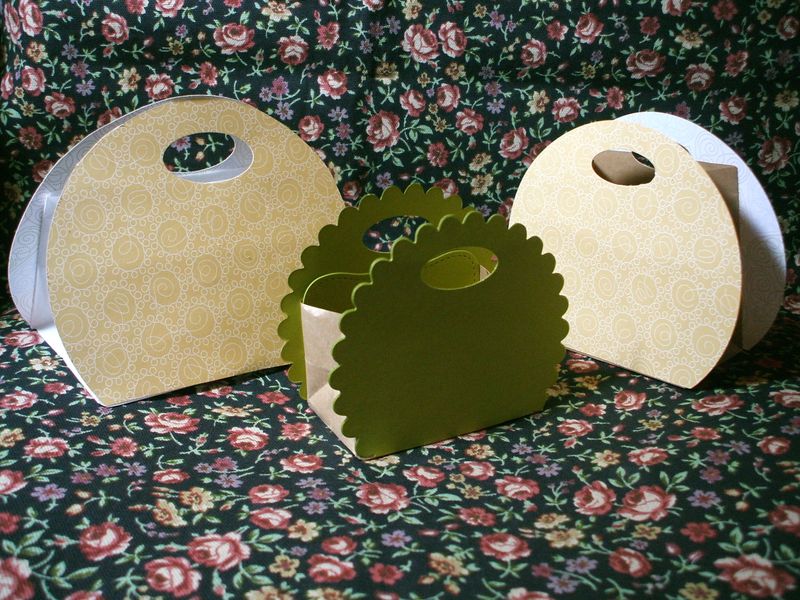
 Above is some more examples I put together for you to illustrate some variations on the theme. That same Scallop Circle Bigz die I was telling you about makes a perfect handbag when paired with the smaller lunch sacks (I got mine at Michael's–don't tell anyone I was in there!) and same thing, chopped off the bottom edge to fit the width of the lunch sack, punched handles (Small Oval punch this time) and adhered.Another CUTE touch was that a Top Note cut in half just fit on the insides of the bag–so the insides are nice and finished and the stitching is such a cute touch!
The Sale A Bration DSP sample on the left is the full six-inch circle size, but the one on the right is a four inch size with a smaller lunch sack. Even the smaller bags still fit 3×3 cards, so it's all good!
So there you go! Thanks to everyone who commented on the bag. I hope to see a mega proliferation of these in the next few days as you all discover how EASY and ADDICTIVE these handbags can be. Enjoy!


Thanks so much for the instructions . . . I can’t wait to try this!
super cute!
Oh, I LOVE these handbags and much easier now with the Circle Scissor Plus! LOVE the Scallop Bag!! I know what’s on my to do list! Not the dusting that’s for sure! TFS your great projects.